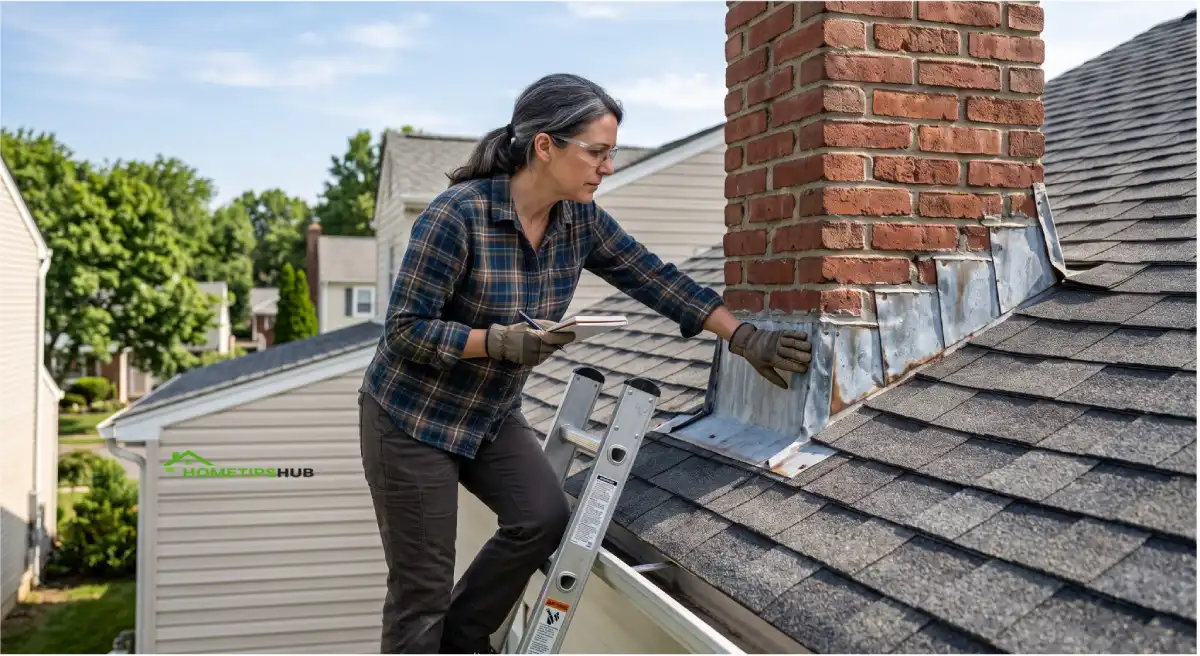
Your roof protects your entire home from the elements, but did you know that roof flashing repair is one of the most overlooked maintenance tasks homeowners face? Roof flashing—those thin strips of metal that seal joints and transitions on your roof—quietly prevents water from seeping into your home. When roof flashing fails, the damage can be catastrophic and expensive.
This comprehensive guide walks you through everything you need to know about roof flashing repair, including common mistakes that cost homeowners thousands in water damage repairs. Whether you’re dealing with a leaky chimney, a damaged skylight, or general wear and tear, understanding how to identify and address flashing issues will save you time and money.
By the end of this article, you’ll understand the signs your roof flashing needs repair, learn the most common mistakes contractors and homeowners make, discover the costs involved in professional roof flashing repair, and decide whether DIY roof flashing repair is right for your situation.
What Is Roof Flashing and Why Does It Matter?
Roof flashing is the thin metal barrier installed where your roof meets vertical surfaces like chimneys, walls, skylights, and roof valleys. Think of it as the insurance policy for your roof’s vulnerable joints. Without proper flashing on a roof, water naturally follows gravity and gaps, finding its way into your home’s interior.
The primary purpose of roof flashing repair work is to maintain watertight seals at these critical transition points. Metal roof flashing is typically made from aluminum, steel, or copper, each offering different durability levels and price points. Over time, flashing on a roof deteriorates due to UV exposure, temperature fluctuations, and weather stress.
Why Roof Flashing Repair Is Crucial:
- Prevents water intrusion and interior damage
- Protects structural integrity
- Extends overall roof lifespan
- Maintains home value and insurance coverage
- Prevents costly mold and rot issues
Common Roof Flashing Repair Mistakes: What to Avoid
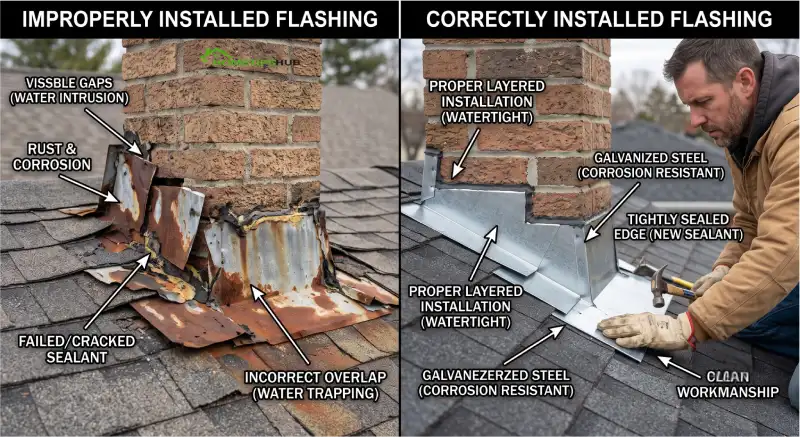
Understanding the most common errors in roof flashing repair will help you avoid expensive problems. Many homeowners and even some contractors make these preventable mistakes:
Mistake #1: Using Wrong Sealant Materials
One of the biggest roof flashing repair mistakes is applying the wrong sealant. Roofing cement, while commonly used, isn’t always the best solution. Some sealants break down quickly under UV exposure or fail to remain flexible as temperatures change.
Better approach: Use manufacturer-recommended flashing sealants or polyurethane products designed specifically for your roof type and climate.
Mistake #2: Failing to Replace Damaged Flashing
Many homeowners patch existing damaged flashing instead of replacing it entirely. When your roof flashing needs repair at joints, simply sealing over damage creates a false fix. How to repair roof flashing properly often means replacing it, not just sealing it.
Mistake #3: Improper Installation Angles
Flashing repair for roof leaks requires precise angles to ensure water runs off, not toward your roof. Incorrectly installed step flashing or improper flashing around chimneys can actually redirect water into your home.
Mistake #4: Ignoring Surrounding Shingle Damage
Professional roof flashing repair near me often reveals that surrounding roofing materials are also damaged. Fixing only the flashing while ignoring compromised shingles leads to continued leaks.
Mistake #5: Skipping Proper Cleaning
Roof flashing repair without proper surface preparation is destined to fail. Dirt, algae, and old sealant residue prevent new materials from adhering correctly.
Mistake #6: Over-Relying on Caulk
While caulking plays a role in roof flashing repair, it’s not a complete solution. Caulk alone cannot handle the expansion and contraction that metal roofing experiences.
Mistake #7: Removing Shingles Without Care
Roof flashing repair without removing shingles properly causes additional damage. Rushing this step tears shingles and creates new leak points.
Mistake #8: Ignoring Rust and Corrosion
Rust spots on metal roof flashing mean deterioration has begun. Ignoring these signs leads to perforation and through-holes that allow water penetration.
Mistake #9: Missing Proper Overlap
Professional flashing repair requires correct overlapping directions so water sheds properly. Reversed overlaps create paths for water to travel backward into your roof.
Mistake #10: Delaying Repairs After Storm Damage
Roof flashing repair after storm damage shouldn’t wait. Temporary fixes become permanent problems when left unaddressed, and water damage compounds quickly.
| Common Mistake | Why It Fails | Correct Solution |
|---|---|---|
| Using wrong sealant | Breaks down in UV and temperature changes | Use manufacturer-recommended products for your roof type |
| Patching instead of replacing | Damage returns; seal fails | Replace damaged flashing sections entirely |
| Incorrect angles | Water redirects into roof | Ensure 45-degree angles and proper pitch |
| Ignoring surrounding damage | New leaks develop nearby | Inspect and repair all affected materials |
| Skipping surface prep | Poor adhesion and early failure | Clean thoroughly before applying sealant |
| Over-caulking | Caulk alone can’t handle movement | Use flexible sealants and proper fastening |
| Careless shingle removal | Creates new leak points | Use heat gun; carefully remove and replace shingles |
| Missing corrosion signs | Holes develop; water flows through | Replace corroded sections immediately |
| Wrong overlap direction | Water channels into roof | Ensure water sheds away from structure |
| Delaying repairs | Damage spreads; costs increase | Address issues immediately after detection |
Signs Your Roof Flashing Needs Repair
Early detection of flashing problems saves thousands in water damage restoration. Here’s how to identify roof flashing issues before they become catastrophic:
Visual Warning Signs
Interior indicators: Water stains on ceilings or walls near chimneys, skylights, or roof valleys suggest flashing failure. Discoloration typically appears during or after rain.
Exterior indicators: Look for:
- Visible rust or corrosion on metal roof flashing
- Gaps between flashing and roofing materials
- Lifted or curling flashing edges
- Cracked sealant around flashing joints
- Dark streaks indicating water damage pathways
- Granule loss around flashing areas
Physical Damage Signs
After severe weather, inspect for:
- Bent or dented flashing metal
- Separated flashing seams
- Missing fasteners or loose nails
- Cracks radiating from flashing penetrations
- Peeling or bubbling paint on metal flashing
Leaking Roof Flashing Fix Indicators
Emergency roof flashing leak repair is needed when you notice:
- Active dripping during rainfall
- Damp insulation in attic spaces
- Mold growth near roof penetrations
- Musty odors in upper rooms
- Sagging drywall or plaster damage
How Long Does Roof Flashing Last?
Metal roof flashing typically lasts 15-20 years with proper maintenance. Copper flashing can exceed 50 years, while aluminum flashing may need replacement sooner. Regular inspections help extend flashing life significantly.
Understanding Roof Flashing Types and Repair Costs
Different roof flashing types serve specific purposes and cost differently to replace. Understanding your flashing type helps estimate roof flashing replacement cost accurately.
Types of Roof Flashing
Step Flashing: Used along roof-to-wall transitions and chimneys. Step flashing replacement cost typically ranges from $300-$800 per linear foot installed, depending on materials and complexity.
Drip Edge Flashing: Installed at eaves and gables to direct water away. Repairs usually cost $200-$500.
Valley Flashing: Protects roof valleys where two planes meet. This is critical flashing on a roof. Flashing repair for roof valleys typically costs $400-$1,200.
Chimney Flashing: Seals the chimney-to-roof junction. How to repair roof flashing around a chimney varies by damage level. Repairs range from $300-$1,500, with full replacement costing up to $2,500.
Skylight Flashing: Seals skylight installations. Skylight flashing repair costs $200-$800 depending on damage extent.
Ridge Cap Flashing: Covers ridge lines. Metal roof flashing repair for ridge areas costs $150-$400.
| Flashing Type | Primary Function | Typical Repair Cost | Replacement Cost | Lifespan |
|---|---|---|---|---|
| Step Flashing | Roof-to-wall transitions, chimneys | $300-$800 | $500-$1,200 | 15-20 years |
| Drip Edge | Eaves and gables water direction | $200-$500 | $300-$700 | 20-30 years |
| Valley Flashing | Roof plane intersections | $400-$1,200 | $600-$1,500 | 15-20 years |
| Chimney Flashing | Chimney-to-roof sealing | $300-$1,500 | $1,500-$2,500 | 10-15 years |
| Skylight Flashing | Skylight installations | $200-$800 | $400-$1,000 | 10-15 years |
| Ridge Cap Flashing | Ridge line protection | $150-$400 | $300-$600 | 15-25 years |
Cost to Repair Roof Flashing in 2026
The average cost to repair roof flashing in 2026 ranges from $300-$2,500 for individual repairs. Professional roof flashing repair costs depend on several factors:
- Damage extent: Simple repairs cost less than full replacements
- Flashing material: Copper costs more than aluminum or galvanized steel
- Location accessibility: Hard-to-reach areas increase labor costs
- Roof complexity: Complex roof designs increase repair complexity
- Local labor rates: Geographic location significantly affects pricing
- Contractor experience: Experienced roof flashing contractors charge premium rates
Budget Tip: Get multiple quotes from local roof flashing contractors. Price variations of 30-50% between contractors are common, but choose based on reputation, not just cost.
Step-by-Step DIY Roof Flashing Repair Guide
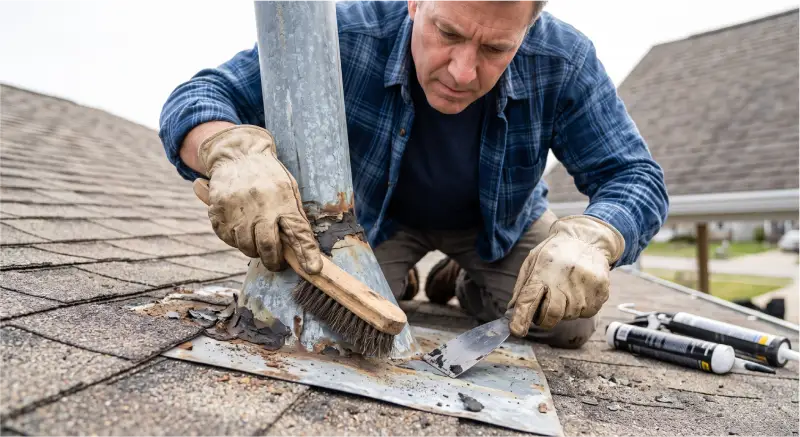
Some roof flashing repair projects are suitable for homeowners with roofing experience. This DIY roof flashing repair guide covers basic repairs. For complex work or steep roofs, hire professionals.
Preparation Phase
Step 1: Safety First
- Use proper fall protection equipment
- Work during dry conditions
- Never work on wet or icy roofs
- Have someone aware of your location
Step 2: Gather Materials For best sealant for roof flashing repair, collect:
- Recommended flashing sealant (polyurethane or manufacturer-specific)
- Metal flashing replacement pieces (if needed)
- Roofing nails (stainless steel preferred)
- Roofing cement
- Caulk gun
- Heat gun or hair dryer
- Wire brush
- Scraper
- Safety equipment (gloves, goggles, harness)
Repair Process
Step 3: Inspect and Assess Before starting roof flashing repair, thoroughly inspect the damage:
- Photograph damage from multiple angles
- Mark all problem areas with chalk
- Determine if repair or replacement is necessary
- Check surrounding materials for damage
Step 4: Clean the Area Proper preparation is crucial for successful roof flashing repair:
- Remove debris and leaves
- Use wire brush to remove rust and corrosion
- Scrape away old sealant and caulk
- Clean with degreaser if oily
- Let dry completely (at least 24 hours after rain)
Step 5: Remove Damaged Flashing (if replacing) How to replace damaged roof flashing safely:
- Use heat gun to soften roofing cement around nails
- Carefully pry nails with flat bar
- Gently lift and remove old flashing
- Clean exposed area thoroughly
- Inspect underlying roof for damage
Step 6: Install New Flashing or Seal Damage For new installation (how to install flashing on a roof):
- Position flashing correctly with proper angles
- Ensure correct overlap direction (water flows over, not under)
- Apply sealant to underside
- Secure with stainless steel nails spaced per code
- Apply sealant over nail heads
- Seal all seams and edges
- Reattach or replace shingles over flashing edges
Step 7: Apply Sealant Best way to fix leaking roof flashing involves:
- Use recommended roofing sealant (not just caulk)
- Apply in continuous, even beads
- Smooth with caulk tool or wet finger
- Fill all gaps and seams completely
- Allow proper cure time before rain exposure
Step 8: Final Inspection
- Check all seams for complete coverage
- Verify no nail heads exposed to weather
- Ensure shingles lay flat and properly secured
- Test water flow with garden hose (optional but recommended)
| DIY Repair Step | Key Considerations | Common Issues | Time Required |
|---|---|---|---|
| Safety & Preparation | Fall protection essential; dry conditions required | Rushing; inadequate safety gear | 30 minutes |
| Material Gathering | Use quality sealants; stainless steel fasteners | Wrong materials; incompatible products | 1-2 hours |
| Inspection & Marking | Document all damage; photo evidence helpful | Missing hidden damage; underestimating scope | 1-2 hours |
| Surface Cleaning | Remove all debris and corrosion; let dry fully | Poor adhesion from inadequate prep | 2-3 hours |
| Flashing Removal | Heat old cement; careful nail extraction | Damage to shingles; torn underlying material | 1-2 hours |
| Installation | Correct angles critical; overlaps matter | Water still penetrates; incorrect positioning | 2-4 hours |
| Sealing | Complete coverage essential; smooth finish | Gaps missed; uneven application | 1-2 hours |
| Final Check | Test with water; verify all sealed | Missed areas; premature failure | 30 minutes |
Professional vs. DIY Roof Flashing Repair
Deciding between professional roof flashing repair and DIY work depends on several factors:
When to Call a Professional Roof Flashing Contractor
Professional roof flashing repair near me is necessary when:
- Roof pitch exceeds 8/12 (too steep for most homeowners)
- You’re uncomfortable working at heights
- Damage involves multiple flashing areas
- Structural damage exists beyond flashing
- Warranty requires professional installation
- Asphalt shingle roofs need extensive work
- Metal roof flashing repair requires specialized knowledge
- Chimney flashing repair guide indicates structural issues
Advantages of Professional Service:
- Proper equipment and safety protocols
- Warranty on workmanship
- Faster completion
- Access to quality materials
- Insurance coverage
- Guaranteed water-tight seals
When DIY Roof Flashing Repair Makes Sense
DIY roof flashing repair guide is appropriate when:
- Damage is minor and localized
- Roof pitch is gentle (under 6/12)
- You have roofing experience
- Only sealing existing flashing (not replacement)
- You’re comfortable with heights and safety
- Project is low on your home
DIY Advantages:
- Labor cost savings (typically 40-60% savings)
- Control over timeline
- Personal satisfaction
- Learning opportunity
DIY Limitations:
- No warranty protection
- Personal safety risk
- Potential for costly mistakes
- May void roof warranty
- More time-intensive
Roof Flashing Repair Before Replacing Your Roof
Should you repair flashing before roof replacement, or wait until re-roofing? This common question has an important answer:
Repair vs. Replace Timing
If your roof has 5+ years of remaining life, repair flashing issues immediately. Waiting for roof replacement means enduring water damage and mold risk during that period.
However, if roof replacement is planned within 12 months, minor flashing repairs using temporary sealants can defer complete replacement. Your roof flashing contractor can recommend the best approach based on roof age and condition.
Flashing repair before roof replacement is smart when:
- Roof has good remaining lifespan
- Flashing damage is isolated
- Water damage is recent (preventable)
- You want to extend roof life
Plan flashing replacement with re-roofing when:
- Multiple flashing areas are damaged
- Roof is near end of life anyway
- Comprehensive roof refresh is planned
- Structural inspection reveals widespread issues
Prevention: How to Extend Flashing Life
Preventing flashing problems is always easier than repair or replacement:
Regular Maintenance Schedule
Twice yearly (spring and fall):
- Inspect all flashing areas visually
- Look for rust, cracks, and separation
- Check sealant condition around joints
- Clear debris from valleys and eaves
- Trim branches near roof
After severe weather:
- Conduct thorough inspection
- Document any damage with photos
- Call roof flashing contractors promptly
- Don’t delay emergency flashing repair
Protective Measures
- Apply UV-protective coatings to metal flashing every 5-7 years
- Install gutter guards to reduce debris buildup
- Trim trees regularly to minimize branch damage
- Install proper ventilation to reduce temperature fluctuations
- Ensure gutters drain properly away from foundations
- Never pressure-wash near flashing seams
- Inspect after storms immediately
Professional Inspection
Schedule professional flashing inspection every 2-3 years. Professional roof flashing inspection catches problems before they become expensive. Many roof flashing contractors offer free inspections.
Frequently Asked Questions
How much does roof flashing repair cost?
Basic roof flashing repair costs range from $300-$800, while extensive repairs or replacements can reach $2,500+. The cost to repair roof flashing in 2026 depends on damage extent, materials, and location. Get quotes from 3-4 professionals for accurate pricing specific to your situation.
Can I repair roof flashing myself?
Yes, minor DIY roof flashing repair is possible for experienced homeowners, but safety is critical. Steep roofs, complex damage, or height discomfort suggest hiring professionals. A DIY roof flashing repair guide can help with simple projects like resealing existing flashing.
What’s the best sealant for roof flashing repair?
The best sealant for roof flashing repair depends on your roof type and climate. Polyurethane sealants typically outperform basic roofing cement. Check manufacturer recommendations for your specific roofing material. Silicone and hybrid products offer excellent durability, especially for metal roofs.
How long does roof flashing repair take?
Simple repairs take 2-4 hours for experienced contractors. Complex replacements, especially around chimneys or skylights, may require a full day or multiple visits. Professional roof flashing repair near me typically completes quickly, while DIY projects take longer.
How do I know if my roof flashing needs repair?
Signs your roof flashing needs repair include water stains near chimneys or skylights, visible rust or gaps in flashing, lifted flashing edges, cracked sealant, or active leaking during rain. Interior water damage appearing suddenly often indicates flashing failure.
Should I repair or replace my roof flashing?
Repair isolated damage if surrounding flashing is sound. Replace entire flashing sections if corrosion is widespread, damage is severe, or multiple failures exist. Your roof flashing contractor can recommend the best approach after inspection.
What’s the difference between metal roof flashing repair and asphalt shingle flashing repair?
Metal roofs require different fastening and sealing approaches than asphalt shingles. Metal roof flashing repair often involves specialized sealants to prevent corrosion and allow for thermal expansion. Asphalt-compatible materials and techniques differ significantly, so ensure your contractor has experience with your specific roof type.
Do I need to replace my roof if my flashing is damaged?
No, damaged flashing doesn’t require full roof replacement in most cases. Professional roof flashing repair can address the issue without disturbing the rest of your roof. Only when underlying roof structure is damaged do you need to consider full replacement.
Conclusion
Roof flashing repair is essential maintenance that prevents costly water damage, protects your home’s structure, and extends your roof’s lifespan. Understanding common mistakes, recognizing warning signs, and knowing when to repair versus replace saves homeowners thousands of dollars.
Whether you’re dealing with a leaking chimney, damaged skylight flashing, or general wear and tear, addressing roof flashing problems quickly prevents complications. The cost to repair roof flashing is minimal compared to the expense of water damage restoration, mold remediation, and structural repairs.
Don’t let flashing problems compromise your home’s protection. Take action today:
- Schedule an inspection – Contact a professional roof flashing contractor for a free assessment
- Get multiple quotes – Compare prices and services from 3-4 local contractors
- Address issues promptly – Emergency roof flashing leak repair prevents bigger problems
- Maintain regularly – Follow prevention tips to extend flashing life and avoid future repairs
Professional roof flashing repair near me is just a phone call away. Most contractors offer same-week or emergency service for urgent leaks. Your roof’s health depends on proper flashing maintenance—invest in it now to protect your home’s future.
Ready to get your roof flashing repaired? Contact a licensed roofing contractor today for a free inspection and detailed repair estimate. Don’t wait for leaks to develop—proactive roof flashing repair saves money and headaches.