

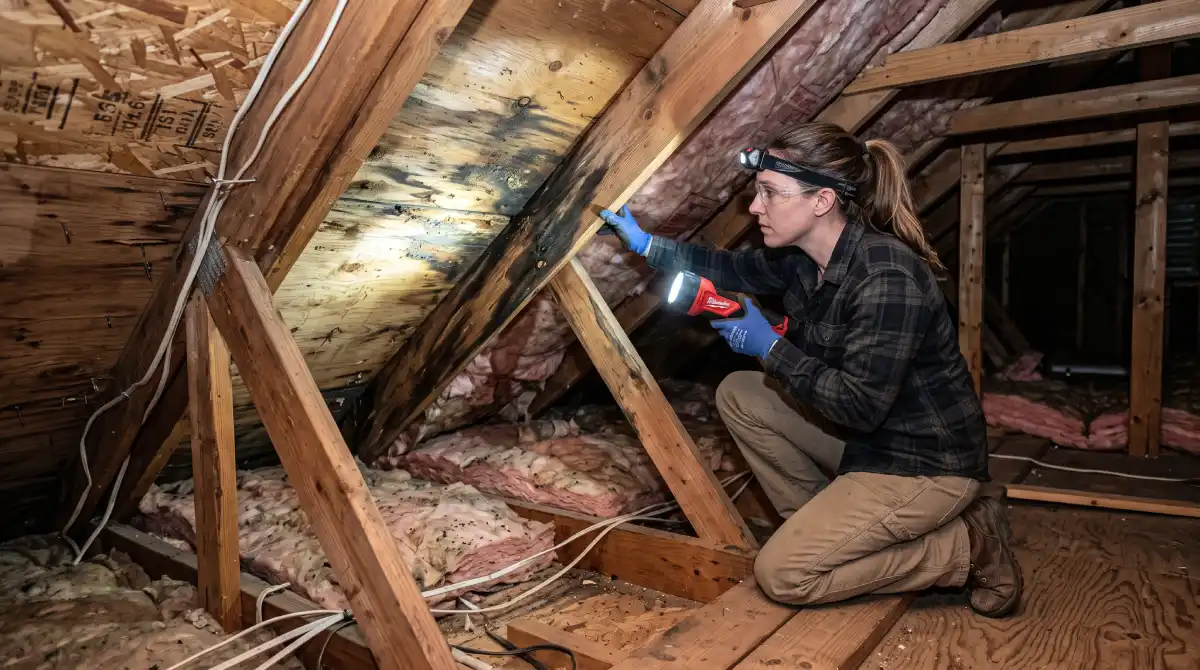
There’s nothing quite like the sinking feeling of spotting a wet patch spreading across your ceiling. That small stain is often the first clue that something bigger is happening above your head. Roof leak detection is the process of finding these problems early, before a minor drip turns into a major structural repair.
In this guide, you’ll learn practical roof leak detection methods, the most common warning signs, and when it makes sense to call a professional roof inspection team. Whether you’re dealing with a sudden drip during a storm or a slow, hidden problem, understanding roof leak detection can save you real money in water damage repairs.
What Is Roof Leak Detection and Why It Matters
This process simply means identifying where water is entering your roofing system and tracing it back to its source. This sounds straightforward, but water rarely travels in a straight line — it often runs along rafters and drywall before appearing far from the actual entry point.
A practical approach is to think of roof leak detection as detective work rather than a single quick check. You’re gathering clues, like a stain here and a musty smell there, and connecting them to figure out where the roofing envelope has failed.
Unresolved leaks lead to mold growth, rotted framing, damaged insulation, and even electrical hazards. Early detection protects your home’s structure, indoor air quality, and your wallet, since the longer a leak goes unnoticed, the more expensive the eventual repair tends to become.
Common Roof Leak Causes You Should Know
Understanding common roof leak causes makes the process much easier, because you’ll know exactly where to look first. Most leaks stem from a handful of recurring issues rather than random bad luck.
- Damaged or missing shingles — wind, hail, and age can crack or lift shingles, exposing the underlayment
- Cracked roof flashing leaks around chimneys, vents, and skylights, where metal seals have separated
- Clogged gutters that force water to back up under the roof edge
- Worn pipe boots and vent seals that dry out and crack over time
- Ice dams in colder climates that trap melting snow against the roofline
- Poor attic ventilation, which causes condensation that can mimic an actual leak
One common mistake is assuming a leak originates directly above the ceiling stain. Because water follows the path of least resistance, effective roof leak detection often means checking several feet uphill from where the damage first appears.
Recognizing Roof Leak Signs Inside Your Home
What are the most reliable roof leak signs? The clearest indicators are ceiling water stains, peeling paint, musty odors, and visible mold, usually appearing as yellow-brown rings that grow larger after each rainfall.
Beyond ceiling water stains, watch for:
- Bubbling or blistering paint on ceilings and walls
- A musty, damp smell in specific rooms
- Sagging or soft spots on the ceiling drywall
- Discoloration around light fixtures or vents
For best results, inspect these areas right after a heavy rainstorm, since finding a leak is far easier when water is actively moving through the structure.
How to Detect a Roof Leak From the Attic

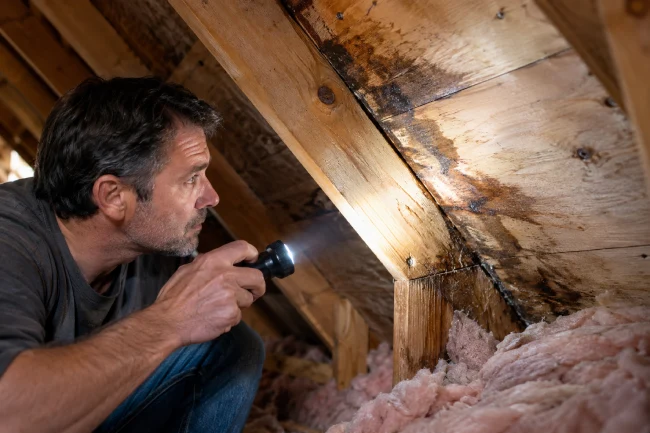
Your attic is one of the most valuable places for roof leak detection, since it gives you a direct view of the roof deck before water reaches the finished ceiling below.
Here’s how to detect a roof leak from the attic:
- Choose a dry, well-lit time to inspect, and bring a strong flashlight.
- Look for dark streaks or discoloration on the wood sheathing and rafters.
- Check insulation for compressed, damp, or discolored patches.
- Press gently on suspicious wood to feel for softness, which suggests moisture.
- Trace any staining upward
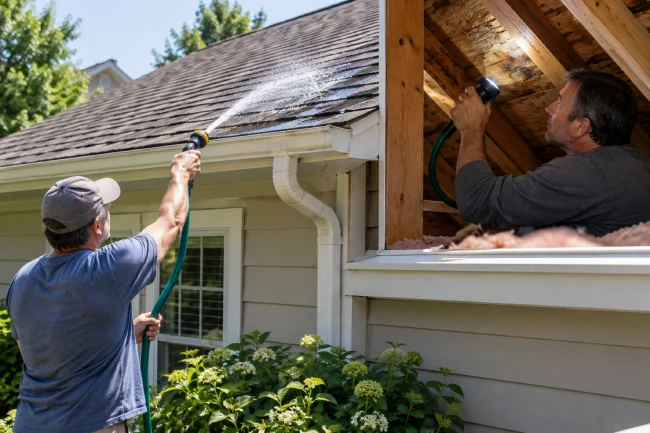
A controlled garden hose test can help locate a suspected roof leak while another person observes the attic for signs of water entry. toward the roofline to estimate the entry point.
An attic roof leak is often easier to catch than a ceiling stain because it reveals problems months before they become visible indoors. A moisture meter adds a layer of professional-grade roof moisture detection that confirms dampness even in materials that look dry.
Step-by-Step Roof Leak Detection Methods
There are several reliable roof leak detection methods homeowners can use before calling in outside help. Combining more than one method gives you the most accurate picture.
The garden hose test is a classic roof leak troubleshooting technique. Have one person run water slowly over a suspected section while another watches from the attic, working section by section until the drip appears.
Visual exterior inspection involves walking the roofline, or using binoculars from the ground for safety, to check for lifted shingles and damaged flashing.
Thermal imaging is a more advanced roof leak detection method that highlights temperature differences caused by trapped moisture, though it typically requires professional equipment.
For best results, document what you find with photos and dates. This record helps with your own inspection notes and with any insurance claim tied to roof water damage.
Roof Leak Inspection Checklist
A structured roof inspection checklist keeps your roof leak detection efforts organized and prevents you from missing less obvious trouble spots.
| Area to Check | What to Look For | Difficulty | Best For |
|---|---|---|---|
| Shingles | Cracks, curling, missing pieces | Easy | DIY visual inspection |
| Flashing (chimney, vents) | Rust, gaps, lifted edges | Moderate | Homeowners comfortable on a ladder |
| Attic sheathing | Stains, soft spots, mold | Easy | Anyone with attic access |
| Gutters & downspouts | Clogs, sagging, poor drainage | Easy | Routine seasonal maintenance |
| Skylights | Cracked seals, condensation | Moderate | DIY or professional roof inspection |
| Ceiling interior | Water stains, bubbling paint | Easy | Quick monthly check |
Running through this checklist twice a year, ideally in spring and fall, turns leak detection into a habit rather than an emergency reaction.
Roof Flashing Leaks and Hidden Roof Leaks
Roof flashing leaks are among the trickiest issues in roof leak detection because flashing sits at the joints where different roof planes, chimneys, or walls meet. These transition points are naturally more vulnerable than a flat expanse of shingles.
Hidden roof leaks are especially frustrating since they can travel along framing for several feet before any visible sign appears. A good rule of thumb: if you find water damage, the actual entry point is often uphill or to the side of the stain, not directly above it.
- Chimney flashing often separates due to temperature swings and settling
- Valley flashing wears out faster because it channels large volumes of water
- Skylight flashing can fail at the seams if the original installation was rushed
A thorough inspection around these areas usually requires removing a small section of shingles or drywall to confirm the true source before repairs begin.
Emergency Roof Leak Detection and Immediate Response
During a storm, emergency roof leak detection becomes about damage control first and diagnosis second. If water is actively entering your home, your priority is protecting belongings and limiting further roof water damage.
What should you do first during an active leak? Place a bucket to catch dripping water, move furniture and electronics away from the area, and if a ceiling bulge appears, carefully puncture it to release trapped water in a controlled way.
Once conditions are safe:
- Photograph the affected area for insurance documentation.
- Check the attic, if accessible, for the water’s path.
- Place a tarp over the suspected exterior area once the storm passes.
- Contact a professional roof inspection service promptly, since temporary fixes rarely hold long term.
Never climb onto a wet or icy roof during a storm. Safety comes before speed every time.
Professional Roof Inspection vs. DIY Troubleshooting
Deciding between DIY roof leak troubleshooting and a professional roof inspection depends on the leak’s severity, your comfort with heights, and your confidence in your findings.
DIY roof leak detection works well for minor, accessible issues like a single damaged shingle or a small gap in caulking. It’s budget-friendly and lets you address problems immediately.
A professional roof inspection makes more sense when:
- The source remains unclear after your own roof leak detection attempts
- The roof is steep, high, or unsafe to walk
- You suspect structural damage or widespread roof water damage
- You need a documented roof leak damage assessment for an insurance claim
Professionals bring tools such as moisture meters, thermal cameras, and drone inspections that go beyond typical roof moisture detection available to homeowners.
Roof Leak Prevention and Long-Term Maintenance
Roof leak prevention is ultimately more cost-effective than repeated roof leak detection and repair cycles. A little consistent maintenance goes a long way toward keeping water out.
Practical roof maintenance tips include:
- Cleaning gutters at least twice a year to prevent backups
- Trimming overhanging branches that drop debris onto the roof
- Replacing worn pipe boots and flashing before they fail completely
- Scheduling a professional roof inspection every one to two years
For best results, pair regular maintenance with periodic roof leak detection walk-throughs so small issues never become expensive ones.
Frequently Asked Questions
FAQ 1: How do you know if you need roof leak detection right away?
If you notice fresh ceiling water stains, a musty smell, or dripping during rain, don’t wait. Prompt roof leak detection helps limit water damage and often keeps repair costs lower than delaying action.
FAQ 2: How much does a professional roof inspection typically cost?
Costs vary by region, roof size, and complexity, but many inspections fall in a moderate range, with advanced services like thermal imaging costing more. Always request a written estimate before work begins.
FAQ 3: Can I do roof leak detection myself without climbing on the roof?
Yes, a good deal of roof leak detection can be done safely from your attic and interior, checking ceilings, walls, and fixtures for early warning signs.
FAQ 4: What is the most common cause of hidden roof leaks?
Damaged flashing and worn pipe boots are among the most frequent culprits, since these transition points are more prone to failure than large, flat sections of shingles.
FAQ 5: How often should I schedule a roof inspection checklist walk-through?
A twice-yearly schedule, typically spring and fall, catches most seasonal wear. Homes in severe weather regions may benefit from an extra check after major storms.
Final Thoughts
Staying ahead of roof problems comes down to consistent, informed roof leak detection rather than reacting after damage has spread. By learning the common causes, recognizing early warning signs, and following a simple roof inspection checklist, you can catch most issues long before they threaten your home’s structure or budget.
Whether you tackle roof leak detection yourself or bring in a professional roof inspection team, the goal stays the same: find the source early, fix it properly, and protect your home from costly water damage. If you’ve noticed any warning signs mentioned here, don’t wait for the next storm. Start your roof leak detection walk-through this week and give your roof the attention it deserves.